

Category D: Directional Control
Welcome to Category D — this is where you start doing things yourself. You'll perform your first solo exit, execute precise directional turns, and begin conducting your own gear checks. Your instructor is still nearby, but they're observing more than assisting.
Category D consists of two jumps. Across these jumps, you must demonstrate proficiency in freefall turns, rear-riser steering, accuracy landings, and equipment checks. The turn requirements below are cumulative — you can spread them across both jumps.
What You'll Demonstrate in Category D
- Perform a solo exit and achieve stability within 5 seconds
- Execute freefall turns using Start-Coast-Stop technique:
- At least four 90° turns (within 20° of target heading)
- At least two 180° turns (within 45° of target heading)
- At least two 360° turns (within 45° of target heading)
- Perform rear-riser turns:
- At least two 90° turns with brakes stowed
- At least two 90° turns with brakes released
- At least one 180° turn with brakes released
- Land within 165 feet (50 meters) of target
- Conduct your own gear checks with instructor supervision
- Understand AAD operation
- Demonstrate spotting awareness (line of flight, clouds, aircraft, exit light, group separation)
Section 1: Exit and Freefall
Solo Exit
This is your first solo exit. Your instructor is still with you, but the responsibility to exit the plane and achieve stability within five seconds is yours. The tools you've practiced — Heading, Altitude, Arch, Legs, Relax — are now second nature. Trust your training.
💡 Tip: On exit, keep your head up and watch the plane fly away from you. This helps maintain your arch and leads to a more stable solo exit.
Freefall Turns: The Start-Coast-Stop Technique
To perform controlled freefall turns, you'll use the Start-Coast-Stop (SCS) technique. This allows for gentle, precise turns that you can stop accurately. You must always know your heading before and during every turn — without a reference point, you won't know how much you've turned or when to stop.
The technique:
- Start: From a stable, neutral body position, gently press one elbow down from the shoulder — no more than 45 degrees. Keep your arms symmetrical and your legs relaxed.
- Coast: As your desired heading comes into view, ease off your input and return to neutral. Your momentum will continue the turn. Use this time to assess your speed and distance to your target heading.
- Stop: Apply a small, brief counter-movement in the opposite direction, then immediately return to neutral.
Tips for different turn sizes:
- 90° turns: Straightforward — pick your new heading before you start.
- 180° turns: Think of it as two 90° turns. Find an intermediate heading at the halfway point.
- 360° turns: Your goal is to return to your original heading. Focus on smooth, continuous motion.
If you overshoot your heading or feel unstable, use your stability mantra (Heading, Altitude, Arch, Legs, Relax) to regain control, then pick a new heading before attempting another turn.
⚠️ Safety Note: All freefall maneuvers should be completed by 6,000 feet, giving you plenty of altitude to focus on a safe deployment.
Estimating Your Freefall Time
You can estimate freefall time by assuming an average terminal velocity of 120 mph:
- First 1,000 feet: approximately 10 seconds (as you accelerate)
- Each 1,000 feet after that: approximately 5 seconds
Example: Exit at 5,000 feet, deploy at 3,000 feet = 2,000-foot freefall. First 1,000 feet takes 10 seconds, second 1,000 feet takes 5 seconds. Total: approximately 15 seconds.
Section 2: Canopy
Rear-Riser Steering
Your parachute has two sets of risers: front and rear. Your brake toggles are attached to the rear risers. Learning to steer with your rear risers gives you immediate control of your canopy after opening — before you've even unstowed your toggles.
Why rear risers work differently than toggles:
- Toggles pull down only the corners of the tail via the steering lines, causing a turn.
- Rear risers pull down the entire back half of the canopy, causing a flatter turn with less input — but more resistance to overcome.
🎯 Why this matters: Rear-riser steering is an essential emergency skill. It's the fastest way to change your heading and avoid a canopy collision immediately after deployment, especially while your brakes are still stowed.
How to perform a rear-riser turn:
- Reach up and firmly grasp the rear risers above where the toggles are stowed.
- Look in the direction you want to turn and check for other canopies.
- Pull the corresponding riser down just 4 to 6 inches.
Practice drills in Category D:
| Drill | Requirements |
|---|---|
| Brakes stowed | At least two 90° rear-riser turns immediately after canopy inspection, before unstowing toggles |
| Brakes released | At least two 90° turns and one 180° turn with toggles in hand |
⚠️ Safety Note: Stop all rear-riser steering practice by 2,000 feet so you can focus on your landing pattern.
Accuracy Landings
Before each jump, you'll work with an instructor to identify your landing target. Your goal is to land within a 165-foot (50-meter) radius of that target with minimal radio assistance.
After each jump, record your distance from the target in your logbook. Tracking your progress helps you identify patterns and improve your consistency.
💡 Tip: Use an aerial map tool like Google Maps to visualize a 165-foot radius around your target before your jump. This helps you understand what "close enough" actually looks like from above.
Section 3: Emergency Procedures
📝 Third time through: This is your third review of emergency procedures during AFF — you covered them in Categories A and B as well. The repetition is intentional. These responses need to be automatic, not something you think through in the moment.
Decision Altitude
As your experience grows and your pull altitude lowers, quick recognition of malfunctions becomes even more critical. You must be able to recognize a problem, decide to cut away, and deploy your reserve by your 2,500-foot decision altitude.
Before you attempt to fix anything, check your altitude first. Your decision is based on your height above the ground.
The three-question flowchart:
- Is it there? Look up — confirm you have a canopy over your head.
- Is it square? Does it look like a fully inflated wing?
- Is it steerable? Test responsiveness with your toggles or rear risers.
Your instructor will put you back in the training harness to review malfunctions again. This hands-on practice builds the muscle memory and decision-making speed you need.
Obstacle Landings: Buildings
Landing on a roof:
- Flare and perform a PLF to absorb the impact.
- Once down, cut away your main canopy to prevent it from catching the wind and dragging you.
- If landing your reserve, try to contain it.
- Wait for help.
Hitting a building broadside:
- Turn your canopy slightly just before impact to strike a glancing blow rather than head-on.
- Flare to slow your descent.
- Prepare to PLF.
Section 4: Equipment
AAD Operation
Your Automatic Activation Device (AAD) is a small computer that deploys your reserve parachute if you're still falling at high speed below a preset altitude. It's your last line of defense.
An AAD is required for students. It's not required after you're licensed, but we strongly recommend continuing to use one.
How it works: The AAD monitors your altitude and descent rate. If you reach its activation altitude while still falling fast, it fires a cutter that severs the reserve closing loop, initiating reserve deployment.
Important: Different AAD manufacturers use different firing criteria, and not all AADs have selectable modes. For example, some models offer student, pro, and tandem settings, while others are sold with a single fixed setting. A Vigil 2+ in student mode activates at approximately 1,300 feet AGL if you're falling at 45+ mph; in pro mode, it activates at 1,100 feet at 78+ mph.
Always read the owner's manual for your specific AAD model to understand its firing parameters and operation.
Your instructor will show you how to turn on and verify the AAD on your equipment.
Conducting Your Gear Checks
In Category D, you begin conducting your own gear checks — with instructor supervision. The habit of repeated, meticulous checks will serve you for your entire skydiving career.
⚠️ Critical: Never allow yourself to be interrupted during a gear check. If you are, start over from the beginning. Also be considerate — don't interrupt other skydivers during their checks.
The three gear checks:
- Before putting the equipment on — your most thorough check
- Before boarding the aircraft
- Before exiting the aircraft
The Check of Threes
A quick self-check for pre-boarding and pre-exit when you're already wearing your gear:
- Three rings: Proper routing of your three-ring release system and RSL
- Three straps: Chest strap and both leg straps correctly routed and adjusted
- Three handles: Main, cutaway, and reserve handles in place and secure — touch them in order of use
Pin Check (Buddy Check)
Once your rig is on, you can't see your main and reserve pins. Ask another jumper for a pin check — they should inspect the back of your system from top to bottom:
- AAD on and indicating correctly
- Reserve pin in place
- Main pin in place
- Correct bridle routing (or ripcord cable movement)
- Reserve handle in place
📝 Note: As a student, you may be asked by another skydiver to perform a pin check on their rig. Not everyone will know you're new. If you're not comfortable, politely let them know you're a student and don't feel confident to perform the check. This is an important safety boundary.
Personal Equipment Check (SHAGG)
- Shoes: Tied, no hooks, closed toe and heel
- Helmet: Adjusted and buckled
- Altimeter: Set to zero on the ground
- Goggles: Tight and clean
- Gloves: Lightweight and proper fit (if needed for cold weather)
3-Ring Assembly
The 3-ring release system is what allows you to cut away from a malfunctioning main canopy. Correct assembly is critical — if it's wrong, your cutaway may not work.
Verify the following:
- Each ring passes through only one other ring
- The white retaining loop passes through only the smallest (top) ring
- The white retaining loop passes through the cable housing terminal end
- The release cable passes through the white retaining loop
[PHOTO PLACEHOLDER: Correctly assembled 3-ring system with components labeled]
Section 5: Rules & Airspace
Cloud Clearance Requirements
The FAA requires skydivers to maintain safe vertical and horizontal separation from clouds (FAR 105.17). These rules exist so you can see other aircraft that may be in your airspace.
Requirements differ above and below 10,000 feet because aircraft speeds are unrestricted above 10,000 feet — you need more distance to spot them.
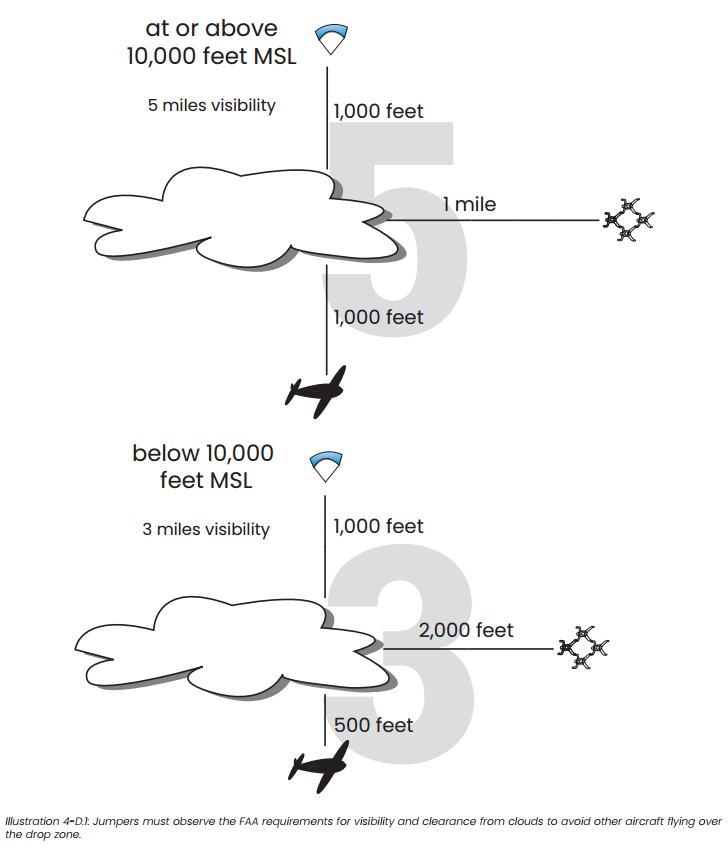
Image courtesy of USPA.
Both the jumper and the pilot share responsibility for cloud clearance and visibility.
Altitude References: MSL vs. AGL
| Term | Definition | Who Uses It |
|---|---|---|
| MSL (Mean Sea Level) | Altitude measured from sea level | Pilots — provides consistent altitude reference regardless of terrain |
| AGL (Above Ground Level) | Your height above the ground directly below you | Skydivers — this is what matters for deployment and landing |
| Elevation | The altitude of a location (like your dropzone) at ground level | Both — used to convert between MSL and AGL |
Your altimeter reads AGL — your actual height above the ground. This is the altitude that matters for you as a skydiver.
Wind Awareness
Before every skydive, you must know:
- Ground winds (surface winds): Wind speed and direction at ground level — affects your landing
- Winds aloft: Wind speed and direction at various altitudes — affects your freefall drift and canopy flight
This information is essential for planning your canopy flight and landing pattern.
Spotting
Spotting means selecting the correct exit point from the aircraft. It's a foundational skill that gives you the best chance of landing safely at the dropzone.
Key concepts:
-
Wind drift: While in freefall, the wind pushes you horizontally. The stronger the winds aloft, the farther upwind your exit point needs to be.
Opening point: The ground reference point where you intend to deploy. Should generally be upwind of your holding area.
Jump run: The predetermined path the aircraft flies before exit. Direction is based on winds aloft.
What to check before exit (S.P.A.C.E.):
Skydivers — other groups exiting
Planes — other aircraft in the area<
Airport position — where you are relative to the DZ
Clouds — none below your exit point
Exit light — if the aircraft has one, is it green?
Looking straight down: To spot effectively, you need to see what's directly below you. Look straight out at the horizon, draw an imaginary line back to you. Then look forward toward your heading and draw another line back. Where those two perpendicular lines meet is the point straight below the aircraft.
You'll observe your instructor's spotting procedures and then demonstrate the technique for looking straight down during jump run.
💡 Tip: To see what's below you effectively, you must get your head completely outside the aircraft.
Additional Resources
Need to review or go deeper? These resources can help:
Mastering the Parachute Landing Fall (PLF) — The skill that protects you on every landing
How to Read Runway Headings — Instant orientation at any dropzone
Review Category C — Wing loading, turbulence, and landing pattern adjustments
Ready to Test Your Knowledge?
The Category D quiz covers solo exits, freefall turns, rear-riser steering, gear checks, AAD operation, and spotting.
Take the Category D QuizFrequently Asked Questions
-
Stop your movement by countering the turn, then return to neutral. As long as you're within the acceptable limits (20° for 90° turns, 45° for 180° and 360° turns), you're fine. If you overshoot beyond that, use your stability mantra to regain control and try again.
-
Rear risers give you immediate canopy control before you've unstowed your toggles. This is critical for collision avoidance right after opening — you may need to turn away from another canopy before you have time to release your brakes. It's also useful for maximizing glide on a long spot.
-
MSL (Mean Sea Level) measures altitude from sea level — pilots use this for consistent altitude reference regardless of terrain. AGL (Above Ground Level) measures your height above the ground directly below you — this is what matters for deployment and landing. Your altimeter reads AGL.
-
In Category D, focus on three things: the direction of jump run, whether there are clouds below, and proper separation from other groups. You'll practice looking straight down from the aircraft to see what's below you. Understanding how winds aloft affect your exit point comes in Category E.